Content from Setting up our Project
Last updated on 2026-03-02 | Edit this page
Estimated time: 12 minutes
Overview
Questions
- Where do we put our project files?
Objectives
- Create a GitLab Repository for our project
Creating a new GitLab Repository
Log in to GitLab and create a new repository for your project. Give it a name that reflects the project - something like “LaTeX CICD Workshop”. You can accept all of the default settings.
What is CI/CD?
CI/CD stans for “Continuous Integration/Continuous Deployment”. It is intended as a way to automate the process of building and deploying software. However the ability of CI/CD to run code and deploy output files makes is a powerful tool for many different kinds of automation projects. In this workshop, we are going to create a CI/CD pipeline that will build a LaTeX document from a source file and deploy the output PDF to a static URL.
If you are familiar to GitHub, you might have head of “GitHub Actions”. GitHub Actions is a CI/CD tool built into GitHub which serves a very similar function to GitLab’s CI/CD. Actions uses a different syntax and has a different set of features than GitLab CI/CD. You could potentially use GitHub to accomplish the same thing we are doing in this workshop, but we will not be covering that here.
How does CI/CD work?
There are two things abou GitLab CI/CD that are important to understand before we get started:
- We will define in our project the commands we want to run in our pipeline
- GitLab will run those commands in a “runner” which is a virtual machine that is assigned to our project.
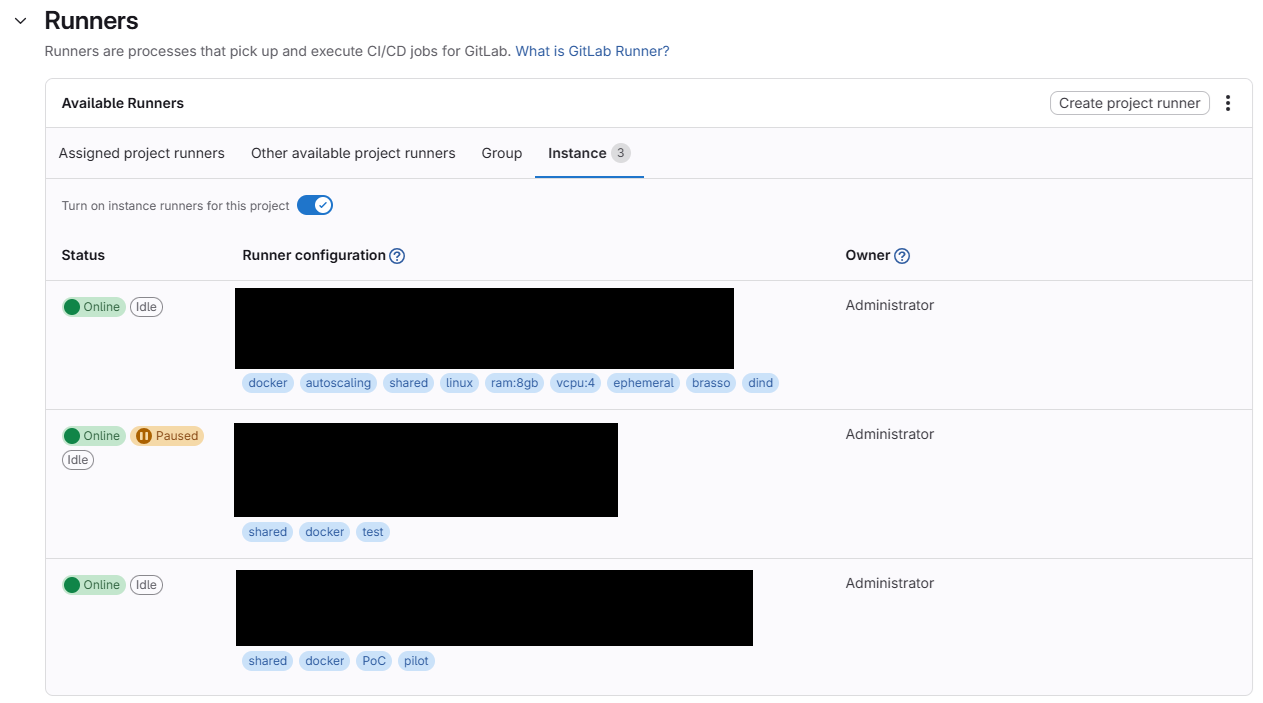
Check that you have a runner assigned to your project before we get started. You can do this by going to your project, clicking on “Settings” and then “CI/CD”. Scroll down to the “Runners” section and look at the “Available Runners”. There are four tabs here:
- Assigned Project Runners
- Other Available Project Runners
- Group
- Instance
Depending on your GitLab instance, you may have access to runners in any of these categories. If you do not have access to any runners, you will not be able to complete the exercises in this workshop.
The .gitlab-ci.yml file
In GitLab, there is a particular file that we use to define the
commands that will run in our pipeline. This file is called
.gitlab-ci.yml and it must be located in the root directory
of our project. The syntax of this file is a little bit tricky, but we
will go through it step by step.
To start, in your project’s sidebar, go to the “Build” section and
select “Pipeline Editor”. As long as you haven’t already writting a
.gitlab-ci.yml file, you should see something that looks
like this:
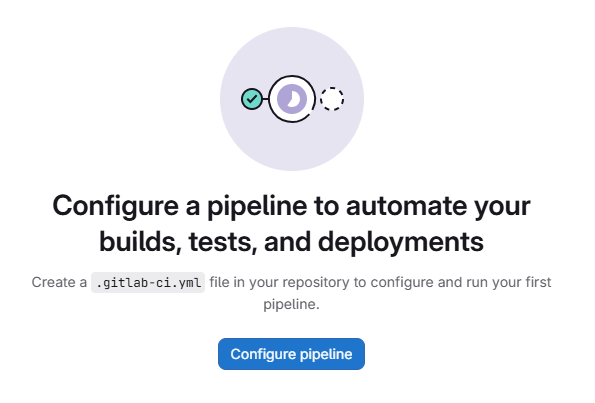
Click on the “Configure Pipeline” button. GitLab will generate a
sample .gitlab-ci.yml file for that demonstrates a few
things about the file syntax. We will go over the syntax in more detail
in the next episode. For now, click “Commit Changes” to save the file to
your project.
In case the “Configure Pipeline” button does not work for you, you
can also create a new file in the root directory of your project called
.gitlab-ci.yml and copy and paste the following content
into it:
YAML
stages:          # List of stages for jobs, and their order of execution
  - build
  - test
  - deploy

build-job:       # This job runs in the build stage, which runs first.
  stage: build
  script:
    - echo "Compiling the code..."
    - echo "Compile complete."

unit-test-job:   # This job runs in the test stage.
  stage: test    # It only starts when the job in the build stage completes successfully.
  script:
    - echo "Running unit tests... This will take about 60 seconds."
    - sleep 60
    - echo "Code coverage is 90%"

lint-test-job:   # This job also runs in the test stage.
  stage: test    # It can run at the same time as unit-test-job (in parallel).
  script:
    - echo "Linting code... This will take about 10 seconds."
    - sleep 10
    - echo "No lint issues found."

deploy-job:      # This job runs in the deploy stage.
  stage: deploy  # It only runs when *both* jobs in the test stage complete successfully.
  environment: production
  script:
    - echo "Deploying application..."
    - echo "Application successfully deployed."
A Running Pipeline
As soon as you commit the .gitlab-ci.yml file, GitLab
will automatically start running the pipeline. You can see the status of
the pipeline at the top of the page:
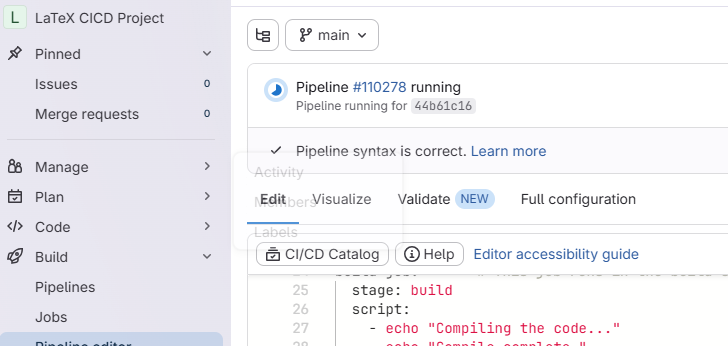
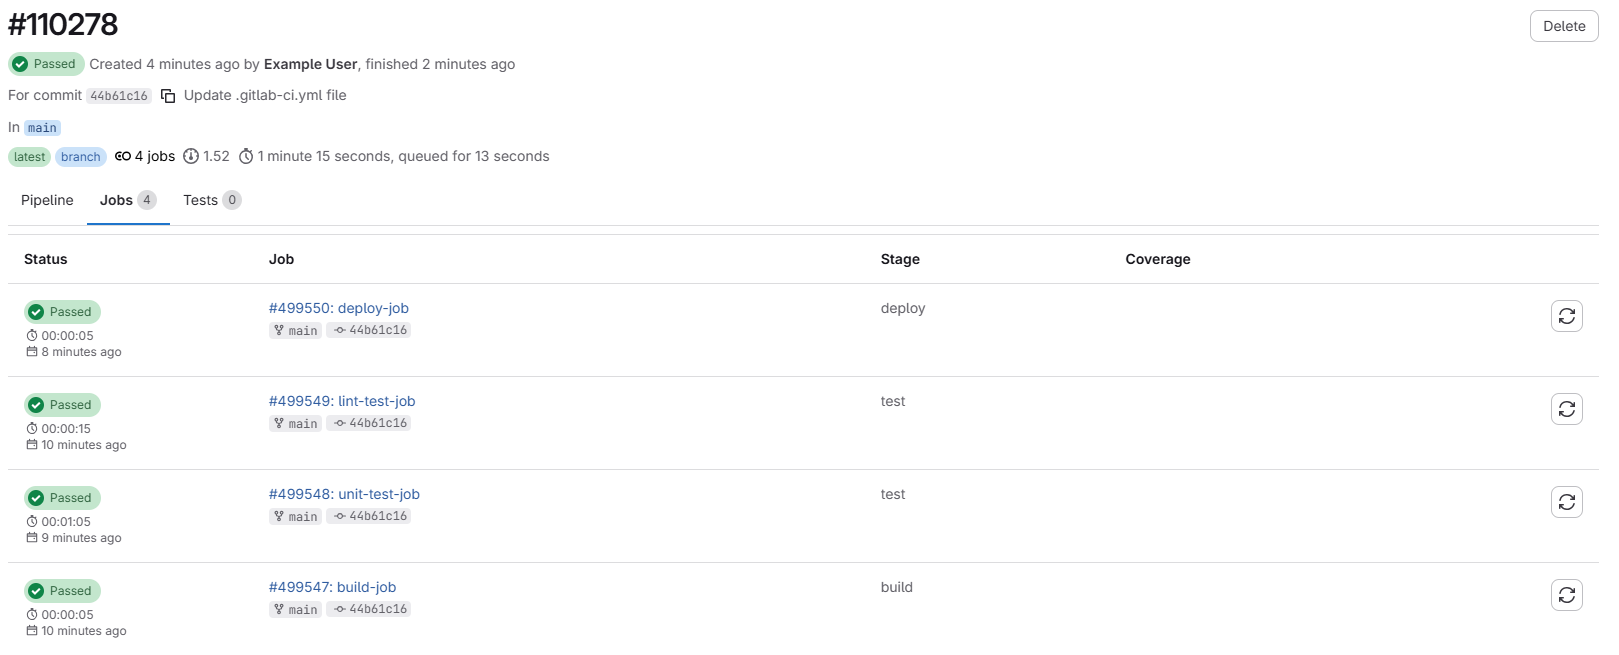
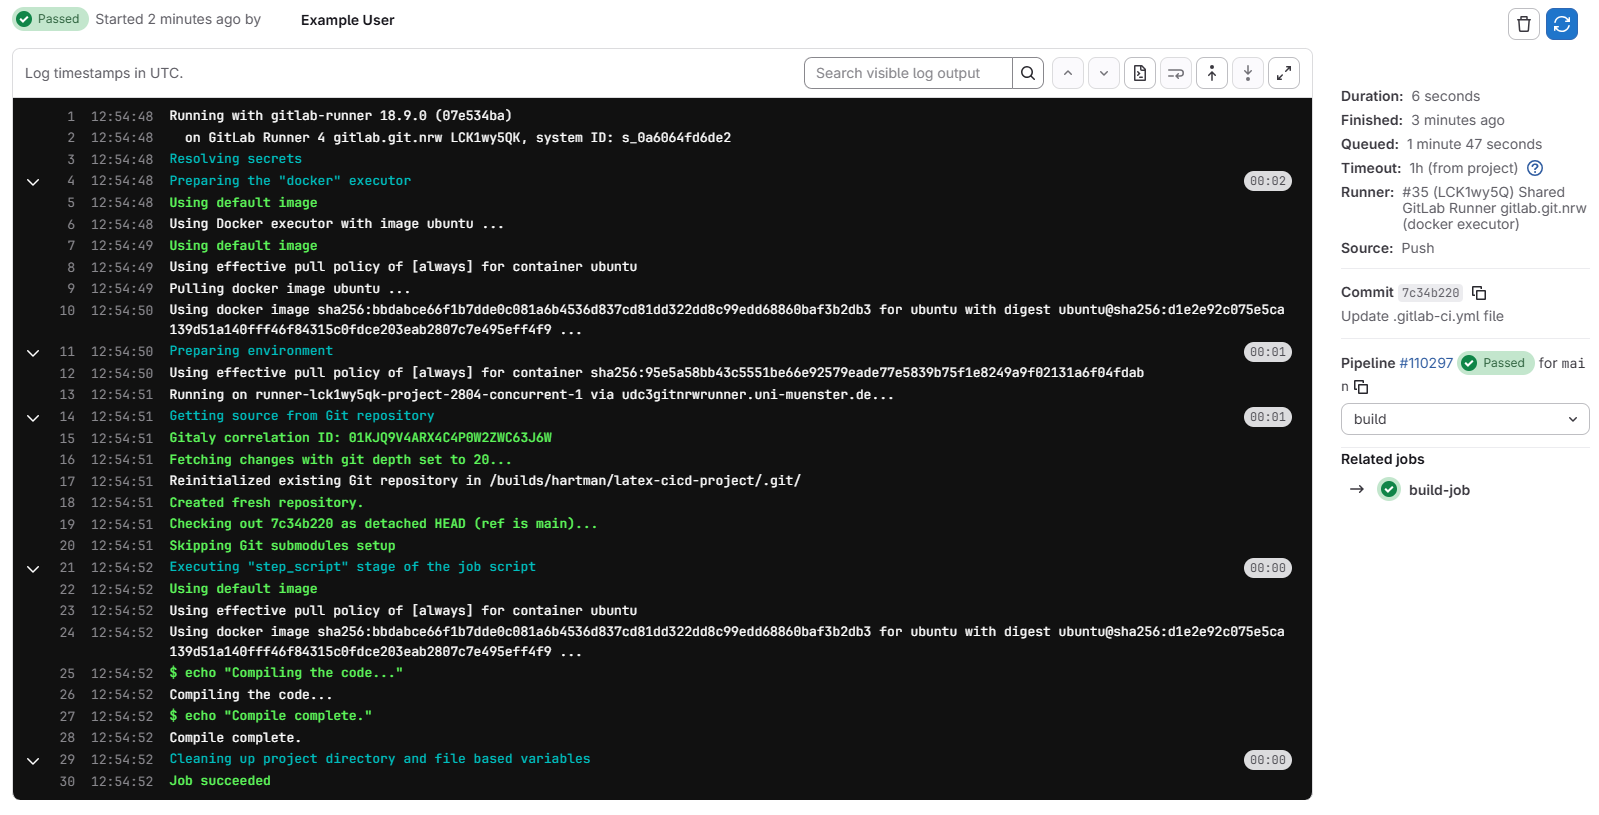
We can view the details of the pipeline by clicking on either the small Circle icon, on on the “Pipeline #____” link, or by navigating to the “Build” > “Pipelines” page in the sidebar.
Our demo pipeline should take about a minute to finish running. When it is done, you should see a green checkmark next to the pipeline. Let’s click on the pipeline to view the details.
Pipeline Details
Looking at the pipeline details we see a graphical representation of the pipeline, along with some metadata about this run of the pipeline:

At the top of the page, we can see the overall pipeline status, when
the pipeline started and finished, the thing that triggered the pipeline
(in this case, our commit of the .gitlab-ci.yml file), the
branch the pipeline ran on, and how long the pipeline took to run.
We can alsosee that our pipeline is made up of several groups, called “stages”. Each stage contains one or more “jobs”. Each job is a set of commands that will be run in a single runner. Stages are run sequentially, but jobs within a stage are run in parallel. In our demo pipeline, we have three stages: “build”, “test”, and “deploy”. The “test” stage has two jobs: “lint-test-job” and “unit-test-job”. The “build” and “deploy” stages each have one job: “build-job” and “deploy-job”, respectively.
We can also click on the “Jobs” tab to see a breakdown of all of the jobs that ran in this pipeline:
Job Details
Clicking on any of the jobs will take us to a page with more details about that job, including the commands that were run and the output of those commands:
- GitLab CI/CD is a powerful tool for automating all kinds of tasks, not just software development.
- The
.gitlab-ci.ymlfile is where we define the commands that will run in our pipeline. - Pipelines are made up of stages and jobs. Stages run sequentially, but jobs within a stage run in parallel.
Content from Understanding the CI/CD File
Last updated on 2026-03-02 | Edit this page
Estimated time: 12 minutes
Overview
Questions
- What is happening in the
.gitlab-ci.ymlfile? - How can we edit the
.gitlab-ci.ymlfile to add a new job to our pipeline? - How can we edit the
.gitlab-ci.ymlfile to add a new stage to our pipeline?
Objectives
- Understand the structure and syntax of the
.gitlab-ci.ymlfile - Edit the
.gitlab-ci.ymlfile to add a new job to our pipeline - Edit the
.gitlab-ci.ymlfile to add a new stage to our pipeline
The .gitlab-ci.yml file
The .gitlab-ci.yml file is written in YAML, which is a
human-readable markup language. It is used to define the commands that
will be run in our CI/CD pipeline. Although intention of the syntax for
this file is to be as simple as possible, it does need to conform to a
specific structure in order for GitLab to be able to read it and run our
pipeline.
YAML stands for “YAML Ain’t Markup Language”. It is a
data serialization language that is often used for configuration files.
It is designed to be easy to read and write for humans, and it is also
easy to parse for computers.
YAML syntax basics
YAML files are made up of key-value pairs. The key is a string that identifies the value, and the value can be a string, a number, a boolean, a list, or a dictionary. Key-value pairs are separated by a colon and a space. For example:
YAML files can also contain lists, which are denoted by a dash and a space. For example:
YAML files can also contain dictionaries, which are denoted by a key followed by a colon and a space, and then the value is indented on the next line. For example:
Anatomy of a .gitlab-ci.yml file
The first section in our file looks like this:
This is defining the stages of our pipeline and the order in which they will be run.
Next, we have the definition of our first job:
YAML
build-job:       # This job runs in the build stage, which runs first.
  stage: build
  script:
    - echo "Compiling the code..."
    - echo "Compile complete."
The job name is the key (build-job) and the value is a
dictionary that contains the details of the job. The keys of a job are
specific to GitLab - a list of available job keywords can be found in
the GitLab
documentation - Job Keywords.
In our case, we have two keys - stage tells us which
stage this job belongs to, and script is a list of commands
that will be run when the job is executed.
Note that the next three jobs are largely the same:
YAML
unit-test-job:   # This job runs in the test stage.
  stage: test    # It only starts when the job in the build stage completes successfully.
  script:
    - echo "Running unit tests... This will take about 60 seconds."
    - sleep 60
    - echo "Code coverage is 90%"

lint-test-job:   # This job also runs in the test stage.
  stage: test    # It can run at the same time as unit-test-job (in parallel).
  script:
    - echo "Linting code... This will take about 10 seconds."
    - sleep 10
    - echo "No lint issues found."

deploy-job:      # This job runs in the deploy stage.
  stage: deploy  # It only runs when *both* jobs in the test stage complete successfully.
  environment: production
  script:
    - echo "Deploying application..."
    - echo "Application successfully deployed."
We can define as many jobs as we like for each stage, but each job
must have a unique name and must belong to a stage that is defined in
the stages section of the file. We cannot have a stage for
which there are no jobs. We also cannot have a job that belongs to a
stage that is not defined in the stages section.
Challenge 1: Add a new Job to the Pipeline
Challenge 2: Add another Job to the Pipeline
Use the pipeline editor to add the following job to the
test stage of our pipeline:
YAML
validate-test-job:
  stage: validate
  script:
    - echo "Running my validate test job... This will take about 20 seconds."
    - sleep 20
    - echo "My validate test job is complete."
What else do we need to add to our .gitlab-ci.yml file
in order for this job to run successfully?
Challenge 3a: Add commands to a job
Add some additional commands to the script section of
the build-job job. Start with ls -a to list
all files in the current directory. Then add a command to print out the
commit SHA of the current commit using the CI_COMMIT_SHA
environment variable.
Try replacing the CI_COMMIT_SHA with something else from the list of GitLab CI/CD Predefined Variables and see what happens.
ls -a will print out all files in the current directory,
including hidden files. Your output might look something like this:
OUTPUT
$ ls -a
.
..
.git
.gitlab-ci.yml
README.mdNote that also present in the output is the README.md
file - when we run a CI/CD job, the runner will automatically clone our
repository and run the commands in the context of that repository!
Depending on the variables you picked, you might find that some of
them print values, and others are empty. Some variables are only
available in certain contexts, e.g. CI_COMMIT_SHA is only
available when the pipeline is triggered by a commit. We will see later
how to add our own variables.
Challenge 3b: Add commands to a job
Try adding a command for a common command line utility:
-
git --versionto get the version of git that is installed in the runner
YAML
build-job:       # This job runs in the build stage, which runs first.
  stage: build
  script:
    - echo "Compiling the code..."
    - echo "Compile complete."
    - ls -a
    - echo "The commit SHA is ${CI_COMMIT_SHA}."
- git --versionWhat happens? Why?
The pipeline will fail with an error message that looks something like this:
OUTPUT
$ git --version
/usr/bin/bash: line 171: git: command not found
This is because the runner that is executing our pipeline is using a Docker image that does not have git installed. We will see in the next episode how to change the Docker image that our runner uses.
- Use
.mdfiles for episodes when you want static content - Use
.Rmdfiles for episodes when you need to generate output - Run
sandpaper::check_lesson()to identify any issues with your lesson - Run
sandpaper::build_lesson()to preview your lesson locally
Content from Using CI/CD to Build and Deploy a LaTeX Document
Last updated on 2026-03-04 | Edit this page
Estimated time: 12 minutes
Overview
Questions
- How can we use CI/CD to automate the process of building and deploying a LaTeX document?
- What are the benefits of using CI/CD for this kind of task?
- How can we run LaTeX commands in our CI/CD pipeline?
Objectives
- Create a CI/CD pipeline that builds a LaTeX document from a source file and deploys the output PDF to a static URL.
Opening up CI/CD: Docker Images
In the previous episode we created a CI/CD pipeline that ran a few
stages and a few jobs, but those jobs didn’t actually do anything, they
just printed out text to the console. You may have tinkered around with
the jobs a bit and found that there were some commands that worked in
the pipeline, like echo and ls, but when you
tried to run a command like git --version the job fails
with an error telling us that the command is not found.
This is because each job in the CI/CD pipeline runs in a Docker container, and that container only contains a limited set of software. The upside of this is that there are a huge variety of Docker images available that contain different software, and we just have to tell our jobs which image we want to use.
Docker images are like pre-built, software only operating systems. You can think of it like a small virtual machine that comes pre-built with a specific set of software. When you run a job in CI/CD, it starts up this virtual machine, runs the commands in the job, and then shuts down.
Selecting a different Docker Image
The default Docker image that CI/CD uses is
ubuntu:latest, which is a very basic image that only
contains the Ubuntu operating system and a few basic utilities. If we
want to run commands that aren’t found in that image, we can select a
different image that does.
In the last exercise in the previous episode, we added a job that
tried to run git --version, but it failed because the
git command wasn’t found. We can tell CI/CD that, for this
job, we want to use a different docker image:
YAML
build-job:       # This job runs in the build stage, which runs first.
  stage: build
  image:
    name: alpine/git:latest # Use a simple git container using alpine linux
    entrypoint: [""] # Override the default entrypoint to allow us to run arbitrary commands
  script:
    - echo "Compiling the code..."
    - echo "Compile complete."
    - ls -a
    - echo "The commit SHA is ${CI_COMMIT_SHA}."
- git --versionThe image is called “alpine/git:latest”. The first part, “alpine/git”, is the name of the image and the second part, “latest”, is the tag, which specifies the version of the image to use. If we use the “latest” tag, it will always pull the most recent version of the image from Docker Hub. If we use a specific tag, e.g. “alpine/git:2.52.0”, it will pull that specific version of the image.
Pulling a specific version of the image is called “pinning”, and is generally recommended for CI/CD pipelines, because it ensures that your pipeline will always run with the same version of the software, even if a new version is released that might have breaking changes.
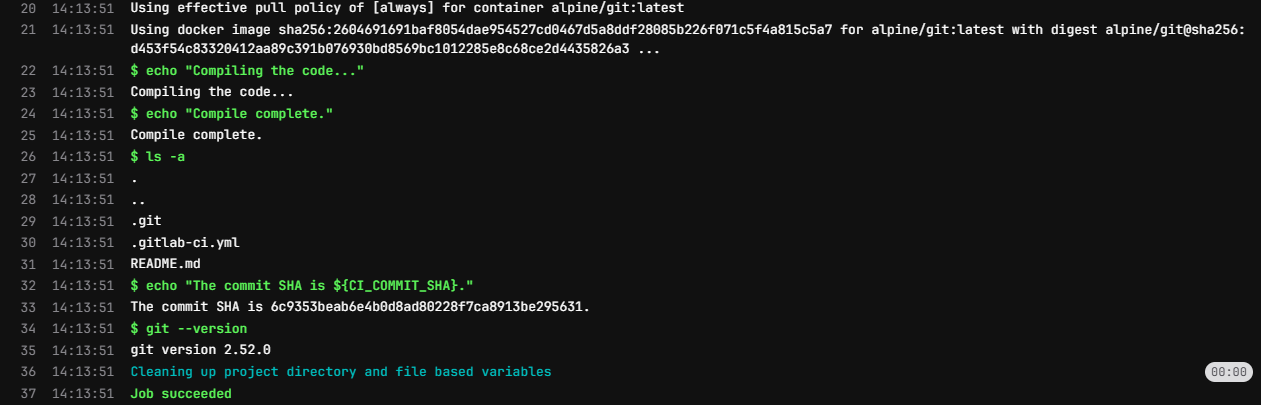
When we check the job details for this pipeline, we can see that the
job is now running a different Docker image, and the
git --version command works successfully:
The CI/CD pipeline uses Docker Hub to pull images from, so we can use the Docker Hub website to search for images that contain the software we want to use. We can also create our own Docker images if we need to, but there are a lot of pre-built images already available.
Building a Basic LaTeX Document
To start with, we need to have a LaTeX document to build. Let’s
create a simple LaTeX document called main.tex in the root
of our repository with the following content:
We want to use CI/CD to automatically build this LaTeX document into
a PDF file, so we’ll need to use a docker image that contains LaTeX.
Searching for “latex” on Docker Hub gives us a few options, and for this
workshop we’ll use the texlive/texlive image, which
contains the TeX Live distribution of LaTeX.
We’ll update our CI/CD pipeline to use this image, and to run the command to build our LaTeX document:
YAML
build-job:       # This job runs in the build stage, which runs first.
  stage: build
  image:
    name: texlive/texlive:latest # Use a TeX Live image that contains LaTeX
  script:
    - echo "Generating PDF from LaTeX source..."
    - lualatex main.tex
    - echo "PDF generation complete."
    - ls -a
The pipeline will run automatically after each of these commits.
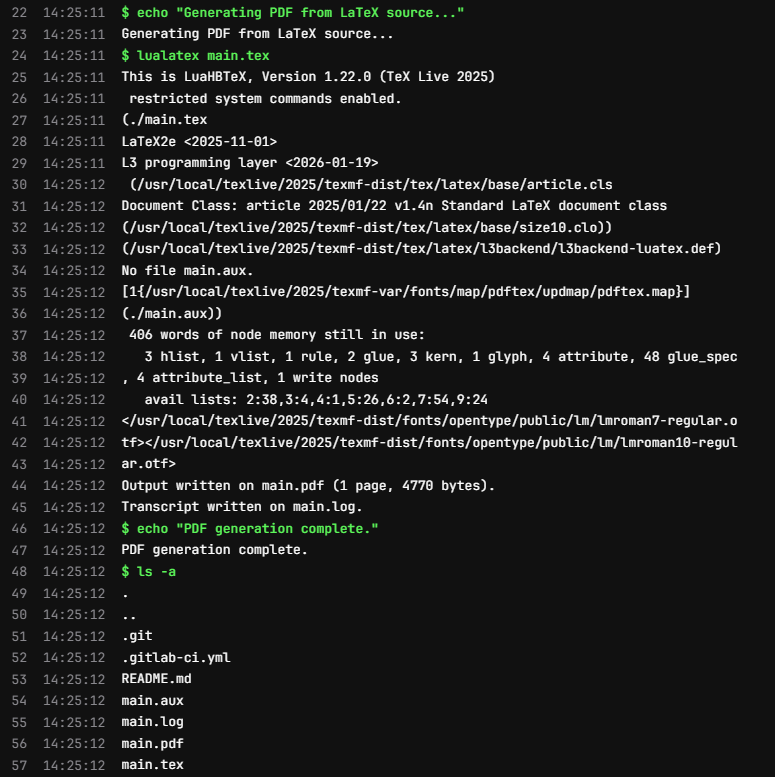
Checking the job details for the build job of the latest pipeline, we
can see that the lualatex main.tex command runs
successfully and generates not only the main.pdf file, but
also a few auxiliary files that LaTeX generates during the build
process:
Artifacts
Ok, so the command to build the LaTeX document ran successfully, but how do we get the generated PDF file somewhere we can look at it?
We can use the “artifacts” feature of CI/CD to specify that we want
to save the generated PDF file as an artifact of the job. This means
that after the job runs, we can download the generated PDF file from the
CI/CD interface. We can specify this in our .gitlab-ci.yml
file like this:
YAML
build-job: # This job runs in the build stage, which runs first.
stage: build
image:
name: texlive/texlive:latest # Use a TeX Live image that contains LaTeX
script:
- echo "Generating PDF from LaTeX source..."
- lualatex main.tex
- echo "PDF generation complete."
- ls -a
artifacts:
paths:
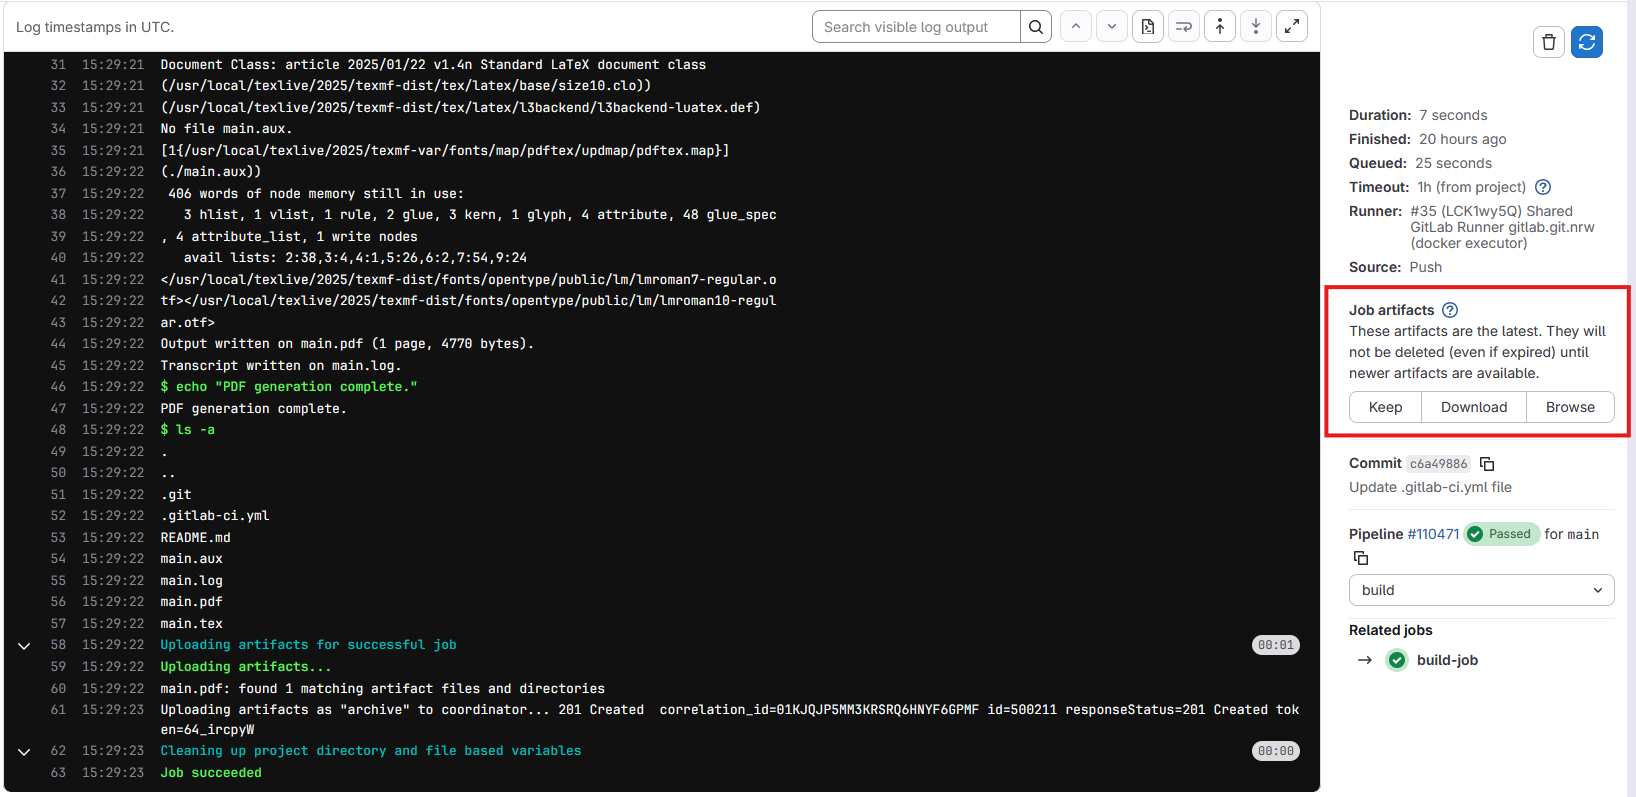
- main.pdfThis tells CI/CD that we specifically want to save the
main.pdf file as an artifact of this job. After this job
runs, you should be able to see a new section in the job details page
called “Job artifacts”:
Clicking on the “Browse” button will show us a list of files that the
job saved as artifacts. Since we specifically told it in the
.gitlab-ci.yml file to only save the main.pdf
file, that’s the only file that will be listed here. Clicking on the
file will let us preview it in the browser, or download it to our
computer.
We can preview this file because it GitLab has a built-in PDF viewer. If we were to save a different type of file as an artifact, we might not be able to preview, but would only be able to download it.
Pages
While it’s nice that we can download the generated PDF file, it would be even nicer if we could send a url to someone so that they could view our pdf without having to log into GitLab and view a specific job. We can do this with the “pages” feature of GitLab CI/CD, which allows us to deploy static files to a public URL.
We need to update a couple of settings to make this easier for us. First, we need to tell GitLab that the Pages feature is for everyone, not just the project owner. Navigate to the Settings > General page in the sidebar, and scroll down to the “Visibility, project features, permissions” section. Under the “Pages” feature, make sure the toggle is turned on and that “Everyone with access” is selected:

Next, let’s update our .gitlab-ci.yml file to deploy the
generated PDF file to GitLab Pages. GitLab CI/CD has a special job for
deploying to Pages, which is called pages. We can add this
job to our pipeline like this:
YAML
pages:
  stage: deploy
  script:
    - echo "Deploying to GitLab Pages..."
    - mkdir -p public # Create the public directory if it doesn't exist
    - mv main.pdf public/ # Move the generated PDF file to the public directory
  artifacts:
    paths:
      - public # Save the public directory as an artifact so that it can be deployed to Pages
Much of this we’ve seen before, but there are a couple of things to take note of here.
- The job must be called
pagesin order for GitLab to recognize it as a Pages deployment job (the stage name can be anything, but the job name must bepages). - We need to move the generated PDF file to a directory called
public, as this is the directory that GitLab Pages expects to serve files from. (We also need to ensure that this directory exists, which is why we have themkdir -p publiccommand). - Finally, we need to save the
publicdirectory as an artifact of this job.
After we commit this change, the pipeline will run. You might notice
however that there’s a job in our pipeline that we didn’t write called
“pages:deploy”. This is a special job that GitLab automatically creates
as a result of having a job called pages in our pipeline.
This job is responsible for taking the artifacts from the
pages job and deploying them to GitLab Pages.
Next we want to view our page. In the sidebar, navigate to “Deploy” > “Pages”:
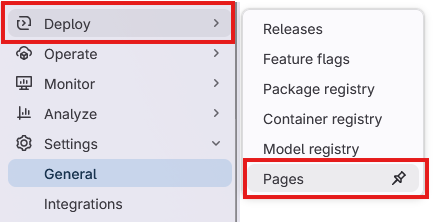
This page gives us an overview of our pages deployment click on the “Visit website” button and…
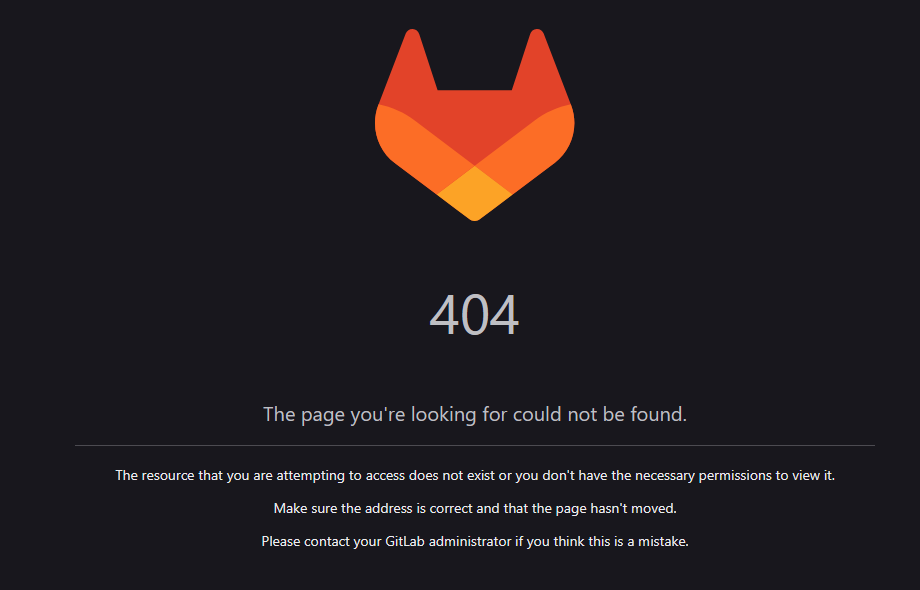
What’s going on here? Why are we getting a 404 error when we try to
visit our page? GitLab Pages is serving the public folder - if we had a
file in this directory called “index.html”, then this would be used as
the homepage of our site. However, since the only file in our public
directory is main.pdf, we have to specify this in the url.
Add main.pdf to the end of the url and try visiting it
again.
Depending on your GitLab deployment, the url for your pages site might have some extra letters and numbers in it. This is one way of ensuring that the url is unique for each pipeline run, but ideally we want just one url. In the Deploy > Pages settings page, there is a tab called “Domains & settings”. In this tab there is a checkbox called “Use unique domain”. If you uncheck this box, your pages site will have a fixed url that doesn’t change with each pipeline run.
Challenge 1: Update the LaTeX document
Update the main.tex file with some additional text in
between the \begin{document} and
\end{document} tags, e.g. add a new paragraph with some
text. If you know some LaTeX, you can also try adding some additional
formatting, e.g. make some text bold or italic, or add a section
heading.
Commit the changes to the file and let the pipeline run. Refresh the page for your GitLab Pages site after the pipeline is finished running. Did the changes you made to the LaTeX document show up on the page?
You may have to wait a minute after the pipeline finishes running for the changes to show up. If you refresh the page after a minute and still don’t see the changes, try forcing a refresh on the page. This will vary depending on your browser:
- Chrome:
Ctrl + Shift + Ron Windows orCmd + Shift + Ron Mac - Firefox:
Ctrl + F5on Windows orCmd + Shift + Ron Mac - Safari:
Cmd + Option + Ron Mac - Edge:
Ctrl + Shift + Ron Windows orCmd + Shift + Ron Mac
Challenge 2: Add an additional file to the public directory
We also have in our repository a README.md file. This file is not
currently being deployed to our Pages site, but we can easily change
that by adding a command to our pages job.
Update the pages job in your .gitlab-ci.yml
so that the README.md file is also deployed to the pages
site.
You will need to move the README.md file to the
public directory, just like we did with the
main.pdf file.
YAML
pages:
  stage: deploy
  script:
    - echo "Deploying to GitLab Pages..."
    - mkdir -p public # Create the public directory if it doesn't exist
    - mv main.pdf public/ # Move the generated PDF file to the public directory
    - mv README.md public/ # Move the README.md file to the public directory
  artifacts:
    paths:
      - public # Save the public directory as an artifact so that it can be deployed to Pages
Challenge 3: Add a landing page to the Pages site
Earlier we found that when we navigated to the url for our Pages
site, we got a 404 error because there was no index.html
file in the public directory. We can fix this by adding an
index.html file when we build our Pages site.
Here is a very simple index.html file that you can
use:
HTML
<!DOCTYPE html>
<html lang="en">
<head>
    <meta charset="UTF-8">
    <meta name="viewport" content="width=device-width, initial-scale=1.0">
    <title>My LaTeX Document</title>
</head>
<body>
    <h1>Links</h1>
    <ul>
        <li><a href="main.pdf">View the PDF document</a></li>
        <li><a href="README.md">View the README file</a></li>
    </ul>
</body>
</html>Save the above HTML code in a file called index.html in
the root of your repository. Then, update the pages job in
your .gitlab-ci.yml file to move this
index.html file to the public directory, just
like we did with the main.pdf and README.md
files:
YAML
pages:
  stage: deploy
  script:
    - echo "Deploying to GitLab Pages..."
    - mkdir -p public # Create the public directory if it doesn't exist
    - mv main.pdf public/ # Move the generated PDF file to public
    - mv README.md public/ # Move the README.md file to public
    - mv index.html public/ # Move the index.html file to public
  artifacts:
    paths:
- public # Save the public directory as an artifact- We can use CI/CD to automate the process of building and deploying a LaTeX document.
- Each job in the CI/CD pipeline runs in a Docker container, and we can specify which Docker image to use for each job.
- We can use the “artifacts” feature of CI/CD to save files generated by a job and make them available for download.
- We can use the “pages” feature of GitLab CI/CD to deploy static files to a public URL.
Content from Pandoc
Last updated on 2026-03-10 | Edit this page
Estimated time: 12 minutes
Overview
Questions
- What is Pandoc and how does it relate to Markdown and LaTeX?
- How can we use Pandoc to convert Markdown files into PDF files?
Objectives
- Use Pandoc to convert Markdown files into different formats
Pandoc
Pandoc is a “universal document converter” run on the command line to convert files from one format to another. It can handle a wide variety of input and output formats, including more simple formats like Markdown and HTML, as well as more complex formats like PDF and Microsoft Word. Depending on the format, pandoc can either convert from, to or both the input and output formats.
For our use case, Pandoc can be used to convert a Markdown file directly into a LaTeX file. This allows us to write our document in Markdown, which is easier to write and read than LaTeX, and then use Pandoc in our CI/CD pipeline to convert it into a PDF file that we can share with others.
Create a document in Markdown
We have our LaTeX document from a previous episode, but wouldn’t it
be nicer if we could write our document in a simpler format like
Markdown and then convert it? Let’s start by re-creating our simple
LaTeX document in Markdown. Create a file called
my_document.md and add the following content:
Next let’s create a job that uses Pandoc to convert this Markdown file into a PDF. We can use the “build” stage again, since this job is independent from our earlier build job that builds our LaTeX document, but note two things:
- We are using a different Docker image that contains some additional
packages and templates called
pandoc/extra. - We need to change the job name to something different than
build-jobsince we already have a job with that name.
YAML
build-job-pandoc:       # This job runs in the build stage, which runs first.
  stage: build
  image:
    name: pandoc/latex:latest # Use a TeX Live image that contains LaTeX
    entrypoint: [""] # Override the default entrypoint
  script:
    - echo "Generating PDF from Markdown source..."
    - pandoc my_document.md --output my_document.pdf # Convert with pandoc
    - echo "PDF generation complete."
    - ls -a
  artifacts:
    paths:
      - my_document.pdf
Then let’s also update our pages job to also publish the PDF file that we just generated:
YAML
pages:
  stage: deploy
  script:
    - echo "Deploying to GitLab Pages..."
    - mkdir -p public # Create the public directory if it doesn't exist
    - mv main.pdf public/ # Move the generated PDF file to public
    - mv my_document.pdf public/ # Move the presentation.pdf file to public
    - mv README.md public/ # Move the README.md file to public
    - mv index.html public/ # Move the index.html file to public
  artifacts:
    paths:
- public # Save the public directory as an artifactYou can of course, also just move all the files in the current
directory to the public directory with the command
mv * public/. This would be more concise, but would also
move any other files that we might have in the directory, which we might
not want to publish.
We could get around this by either setting the output of our pandoc commands to be in either the public directory or a separate directory that we then move to the public directory.
After the pipeline runs, you should be able to access the PDF via the pages url for your project. It should look somehing like this:
Note that Pandoc did a pretty good job converting our Markdown file -
the metadata in our YAML front matter has been used to create a title
section. We even still got to use the \LaTeX command to get
the LaTeX logo. However the overal pdf is somewhat plain looking.
Applying a Template to the Document
The PDF file generated by Pandoc from the Markdown source file is a
little plain. We can apply a template to the document to alter the
output style. Pandoc supports a variety of templates that we can specify
using the --template option when we run the
pandoc command.
We will also need use a different Docker image that contains some
additional packages and templates called pandoc/extra.
Let’s update our build-job-pandoc to use this image and to
apply the eisvogel template to our document:
YAML
build-job-pandoc:       # This job runs in the build stage, which runs first.
  stage: build
  image:
    name: pandoc/extra:latest # Use the Official Pandoc image
    entrypoint: [""] # Override the default entrypoint
  script:
    - echo "Generating PDF from Markdown source..."
    - pandoc my_document.md --output my_document.pdf --template eisvogel # Convert with pandoc
    - echo "PDF generation complete."
    - ls -a
  artifacts:
    paths:
      - my_document.pdf
After the pipeline runs, you should be able to access the PDF via the pages url for your project. The output should look something like this:
It’s still a little plain, but the template has modified the general appearance of our metadata, adding a header and footer section, with our content in the middle.
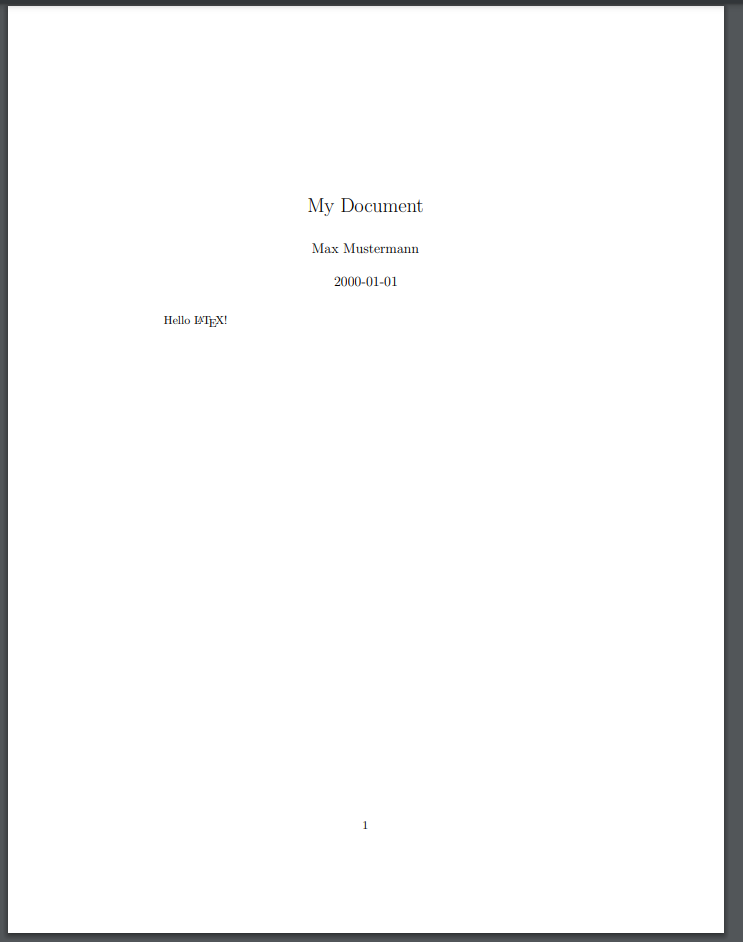
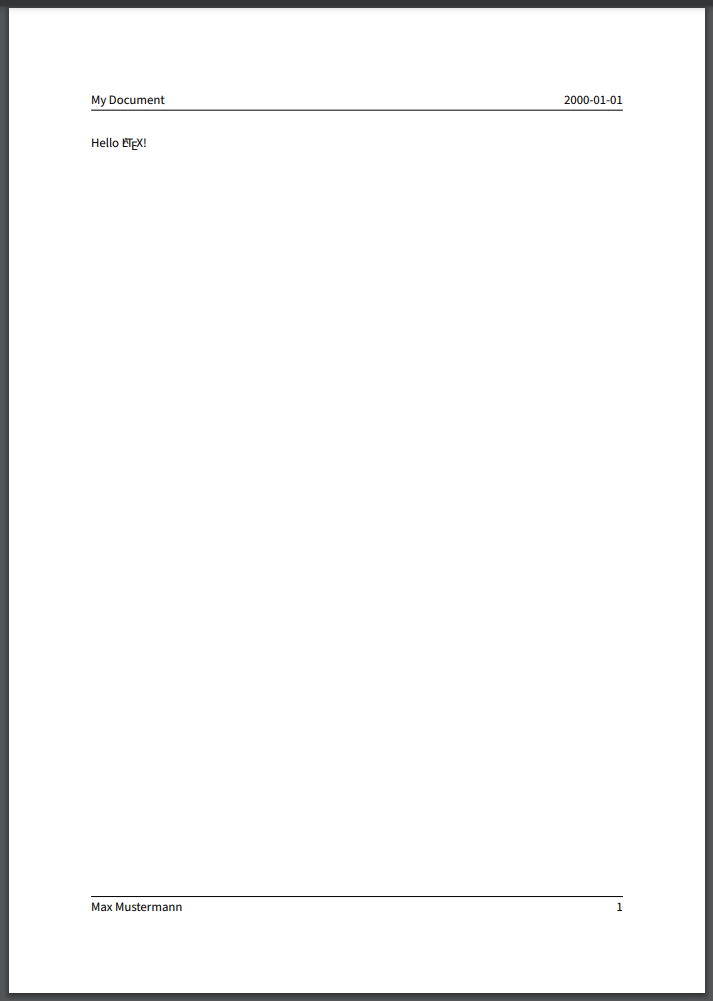
Adding Additional Metadata
At the moment we’ve only defined the title, author and date in our metadata, but EisVogel can parse additional fields to customize the appearance of the final document. Let’s add some more data to our YAML front matter and include some sections in our content
MARKDOWN
---
title: "My Document"
author: "Max Mustermann"
date: "2000-01-01"
titlepage: true
toc: true
toc-own-page: true
---

# Hello LaTeX!

This is the first section of our document.

## This is a subsection of the first section

# This is the second section of our document.

Here's some text in the second section.
Run the pipeline again and see how the output has changed:
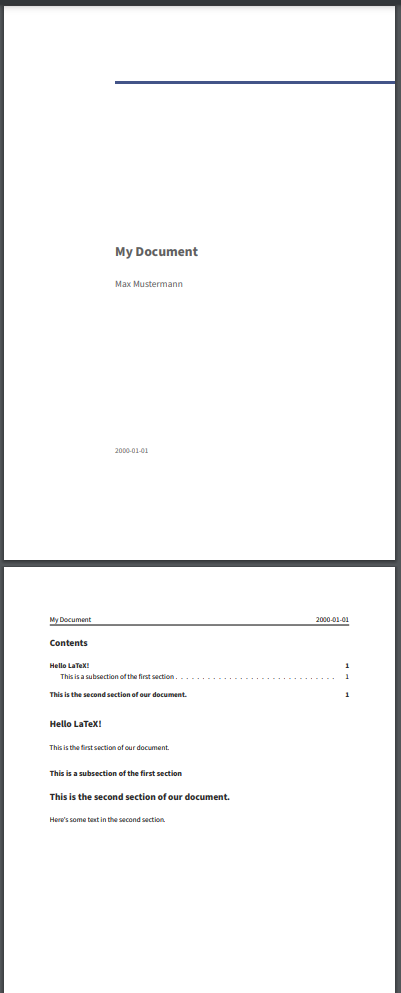
Without touching anything other than the contents of the markdown file, we have a nicely formatted PDF document with a title page and a table of contents!
Challenge 1: Add some additional content to the Markdown file.
Add some additional content to the my_document.md file,
e.g. add a new section with some text. Try adding some additional
markdown elements, like links, tables, and code blocks.
(You can reference this Markdown Cheat Sheet for ideas.)
Run the pipeline again and see how the output has changed.
There’s no real right answer, but here’s an example of what you might
have added to your my_document.md file:
MARKDOWN
---
title: "My Document"
author: "Max Mustermann"
date: "2000-01-01"
titlepage: true
toc: true
toc-own-page: true
---

# Hello LaTeX!

This is the first section of our document.

There is a markdown cheat sheet available [here](https://www.markdownguide.org/cheat-sheet/).

## This is a subsection of the first section

Here is an example of a code block:

```python
def greet(name):
    print(f"Hello, {name}!")
```

# This is the second section of our document.

Here's a table:
| Fruit  | Quantity | Price |
|--------|----------|-------|
| Apple  | 10       | 1.50  |
| Banana | 5        | 10.00 |
And it might end up looking something like this:
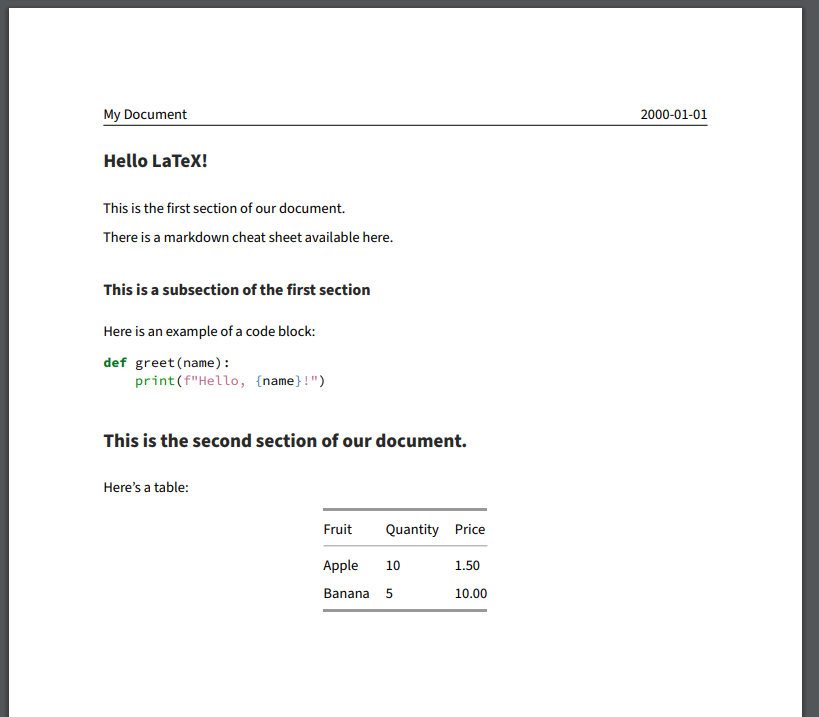
Note the syntax highlighting in the code block and the formatting of the table!
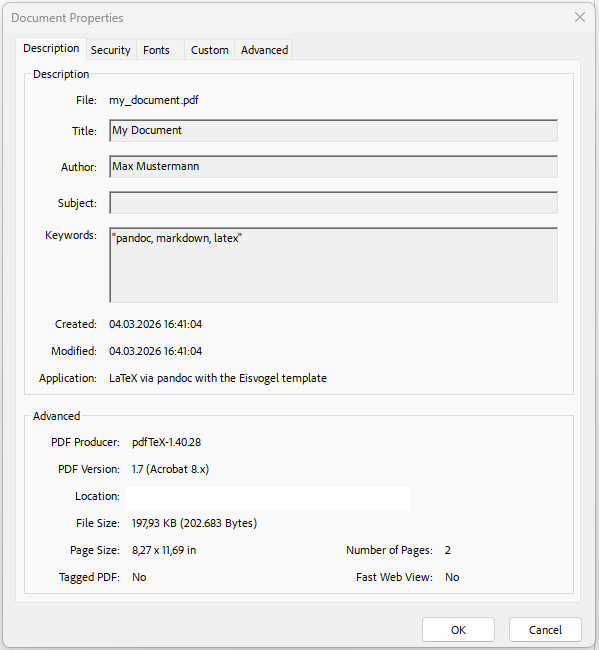
Challenge 2: Pandoc Variables
Pandoc supports a variety of variables that can be used to customize the output of the document that we can add to the YAML front matter of our Markdown file. Check out the pandoc documentation and try a few variables to see how they affect the output:
Again, there’s no one right answer, but a couple things to try out:
MARKDOWN
---
title: "My Document"
author: "Max Mustermann"
date: "2000-01-01"
titlepage: true
toc: true
subtitle: "This is a subtitle"
abstract: "This is an abstract of the document."
keywords: ["pandoc", "markdown", "latex"]
hyperrefoptions:
- linktoc=all
colorlinks: true
---
If you tried the “keywords” variable, you might wonder what this actually does, since it doesn’t seem to have any effect on the output. The “keywords” variable is actually used to add metadata to the PDF file that can be read by PDF readers. If you open the PDF file in a PDF reader and look at the document properties, you should see the keywords that you added:
Challenge 3: Add another File Output Type
We’ve just done markdown to PDF, but Pandoc can convert to a variety
of different formats. Try adding a line to your
build-job-pandoc job to also convert the markdown file into
a different format, e.g. HTML or Microsoft Word.
build-job-pandoc: # This job runs in the build stage, which runs first. stage: build image: name: pandoc/extra:latest # Use the Official Pandoc image entrypoint: [“”] # Override the default entrypoint script: - echo “Generating PDF from Markdown source…” - pandoc my_document.md –output my_document.pdf –template eisvogel # Convert with pandoc - pandoc my_document.md –output my_document.html # Convert to HTML with pandoc - pandoc my_document.md –output my_document.docx # Convert to Word with pandoc - echo “PDF generation complete.” - ls -a artifacts: paths: - my_document.pdf
- We can use Pandoc to convert Markdown files into different formats, including PDF files.
- We can apply templates to our Pandoc documents to customize the appearance of the output.
Content from Working with Custom Templates
Last updated on 2026-03-10 | Edit this page
Estimated time: 12 minutes
Overview
Questions
- How can we use the
beamerclass to create a presentation with Pandoc? - How can we use custom templates with Pandoc?
Objectives
- Create a presentation in Markdown and render it to PDF using the
beamerclass. - Use a custom template to create a presentation in Pandoc.
- Add LaTeX commands to a markdown file to customize the output.
The Beamer Class
In the previous episode we used the default document template to
create a plain document. This time, we’re going to use the
beamer class to create a presentation. The
beamer class is a popular LaTeX class for creating slide
presentations. Just like we did in the previous episode, we can create a
markdown file with some content and then use Pandoc to convert it into a
PDF.
Each Heading in the markdown file will be converted into a new slide in the presentation. The content of each slide will be determined by the content under the corresponding heading in the markdown file.
Let’s start with a simple markdown file that contains some headings and some content under each heading:
MARKDOWN
---
title: "My Presentation"
author: "Max Mustermann"
date: "2000-01-01"
---

# Slide 1
This is the first slide.

# Slide 2
This is the second slide.

- This is a bullet point on the second slide.
- This is another bullet point on the second slide.
As with our last document, we’ll add some metadata in the YAML front matter at the top of the file. This will be used by Pandoc to create a title slide for our presentation.
Finally, we’ll add a line to our CI/CD script to render the document:
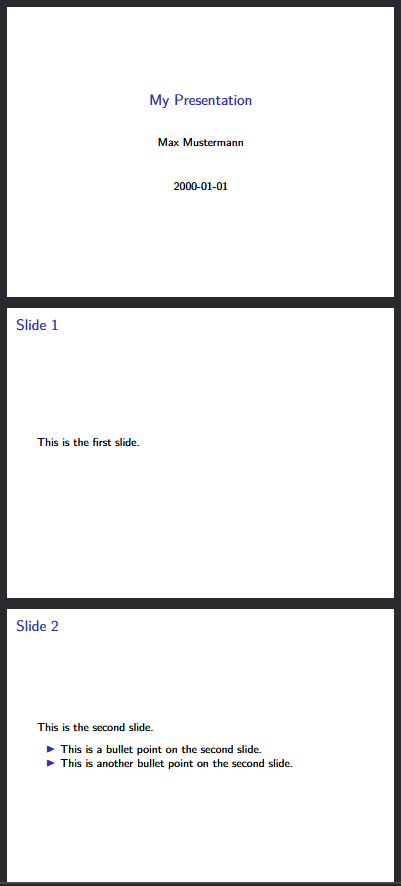
Saving this file to our repository should trigger the pipleine. After running, you should find a PDF file that looks something like this:
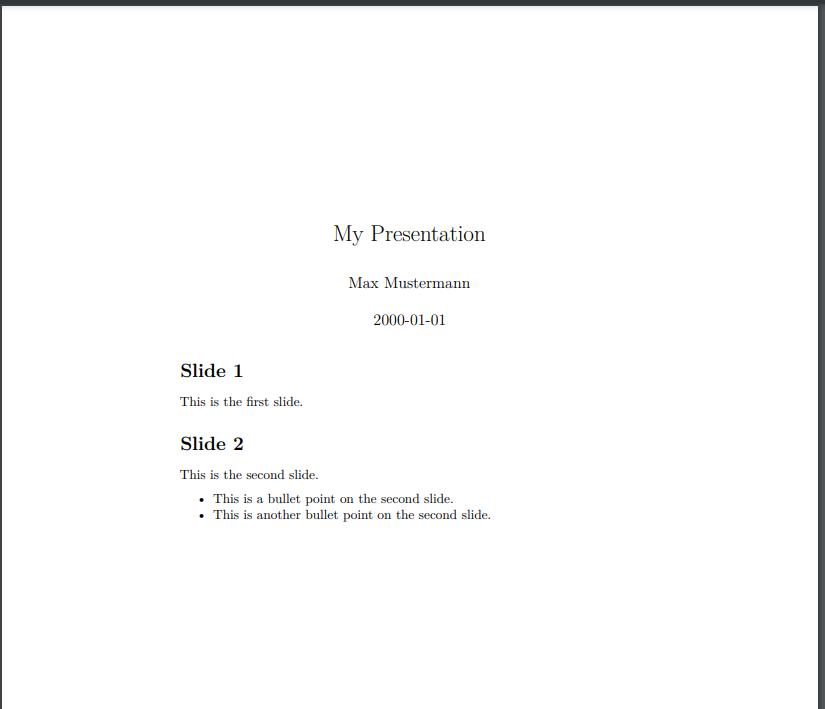
Wait, what? Why doesn’t it look like a presentation? We never told
Pandoc to use the beamer class, and Pandoc isn’t going to
assume anything about the output format if we don’t tell it. We need to
update our CI/CD script to specify that we want to use the
beamer class. We can do this by adding the
-t beamer option to our Pandoc command:
That looks better!:
The RWTH Template
In the previous episode, we used the EisVogel template to create a simple PDF document from our Markdown source file. This time, we’re going to use a custom template that has been created for RWTH. This will require a few more steps to set up, as we will have to extend our Docker image slightly.
Installing the RWTH template
The current Pandoc image does not contain the RWTH template and its
dependencies, so we will have to add some extra information to our CI/CD
script. We can do this in a section called before_script,
which is a section that allows us to specify commands that should be run
before anything in the scripts section.
YAML
before_script:
    - tlmgr option repository https://ftp.tu-chemnitz.de/pub/tug/historic/systems/texlive/2025/tlnet-final/
    - tlmgr install rwth-ci anyfontsize tex-gyre arimo fontaxes extsizes
    - tlmgr install --reinstall beamer
- echo '\providecommand{\tightlist}{\setlength{\itemsep}{0pt}\setlength{\parskip}{0pt}}' > header.texAn explanation of the commands in this section:
-
tlmgris the TeX Live package manager. - The first command sets the repository that
tlmgrwill use to install packages. We need to use a specific repository that contains the RWTH template and its dependencies.- This is required at the moment because an update in the TeX Live distribution causes errors when installing the RWTH template and its dependencies. This is a temporary workaround until the issue is resolved.
- The second command installs the RWTH template and its dependencies
using
tlmgr. - The third command reinstalls the
beamerpackage. - The fourth command creates a
header.texfile that contains a definition for the\tightlistcommand. This command is used in the template by pandoc, and is not defined by default.
Finally, we need to update our pandoc command to tell it to use the
RWTH template. We can do this by specifically telling pandoc that we
want to use the rwth-beamer class.
We also need to tell pandoc to use the header.tex file
that we created in the before_script section. This is done
using the --include-in-header option. The template uses the
\tightlist command, which is not defined by default, so we
have defined it in the header.tex file to avoid errors when
rendering the document.
Our final pandoc command should look like this:
YAML
pandoc presentation.md -t beamer --output presentation_rwth.pdf -V documentclass=rwth-beamer --include-in-header=header.texAnd when we run the pipeline, we should get a PDF file that looks something like this:
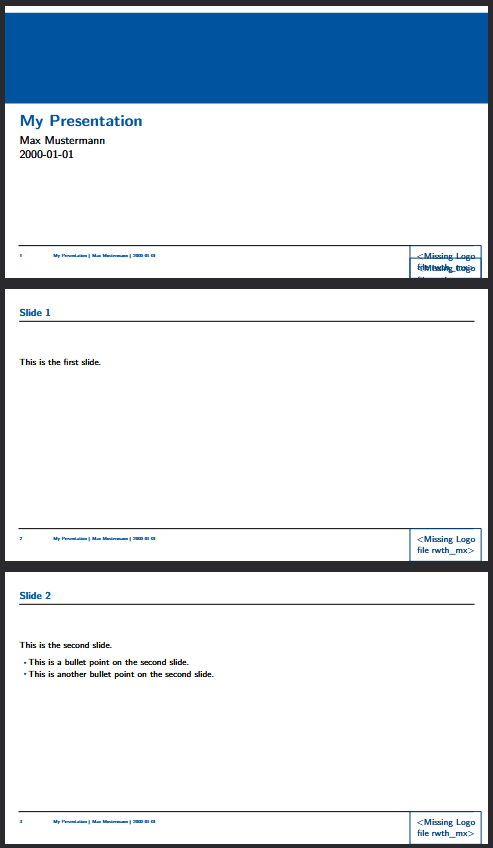
The Missing Logo File
Our template is missing one last thing - the logo file. The template
prints out a message that says
Missing Logo file rwth_mx>. First off, we need a logo
file. We can find an example file in the RWTH-LaTeX-Templates
repository. For our project, we will download the
rwth_mx_cmyk.pdf file and add it to the root of our
repository.
If we were writing a LaTeX document, we would add the logo file as one of the parameters to the document class, like this:
We can do the same thing with pandoc by adding to the YAML front matter of our markdown file:
YAML
---
title: "My Presentation"
author: "Max Mustermann"
date: "2000-01-01"
classoption:
  - logofile=rwth-mx-cmyk
---
Our slides should now look like this:
Adding LaTeX Commands to the Template
We can do all of the basic formatting and content in our markdown file, but we are of course somewhat limited in what we can do with markdown alone. There are may additional options we can perform by adding LaTeX commands to our markdown file. Try updating your markdown file like this:
MARKDOWN
---
title: "My Presentation"
author: "Max Mustermann"
date: "2000-01-01"
classoption:
  - logofile=rwth-mx-cmyk
---

# Slide 1
This is the first slide.

# Slide 2
This is the second slide.

- This is a bullet point on the second slide.

/pause

- This is another bullet point on the second slide.
After running the pipeline, you should see that the third slide is
now split into two slides, with the first bullet point appearing on the
second slide, and the second bullet point appearing on a third slide.
This is because the /pause command tells the
beamer class to pause the slide at that point and wait for
the user to click before showing the rest of the content.
Challenge 1: Adding an alert to a Slide
At the end of the episode, we added a /pause command to
our markdown file to split a slide into two slides. The
beamer class also has an \alert command. Try
adding the following content to your markdown file:
MARKDOWN
# Slide 3

- \alert<1>{This is a bullet point on the third slide.}
- \alert<2>{This is another bullet point on the third slide.}
- \alert<3>{This is yet another bullet point on the third slide.}
What does this do? What happens if you change the numbers in the
alert commands? What happens if you remove the numbers?
The \alert command is used to highlight specific content
on a slide. The numbers in the alert commands specify the
order in which the content will be highlighted. If you remove the
numbers, all of the content will be highlighted at the same time.
- The
beamerclass is a popular LaTeX class for creating slide presentations. - We can use custom templates with Pandoc to create more complex documents.